Web Interface System
This is a front-end system that is dedicated to providing web interface access for administration as well as user access. You setup this kind of system if you want dedicated servers providing only web access. You can have several of these nodes scaling up or down as demand grows or drops.
This profile is used in the Distributed Backend Distributed Frontend and Single Backend Distributed Frontend topologies.
Automated Configuration
Baruwa Enterprise Edition >= 2.0.7 uses an automated wizard based utility called baruwa-setup to configure, update and manage the system. On the first run this utility collects configuration information from the user, performs any required software updates and then configures the system based on the profile selected and the configuration data collected. This simplifies the whole setup and management process so the user does not have to manually edit any configuration files.
The baruwa-setup command is idempotent, meaning it safe to run multiple times and will only make changes if they are required. All future updates and configuration changes to the system should be done using the baruwa-setup command. The utility has a man page that documents all the options available.
A pass phrase is required to secure the authentication information that is collected.
Make sure you choose a strong pass phrase which is easy for you to remember but difficult to guess for others, a long sentence describing a personal experience is a good pass phrase.
To start the configuration process login to the server with the username root and
the password you set during installation.
Then issue the baruwa-setup command at the command prompt:
baruwa-setup
The program will ask you to set a passphrase, enter the passphrase and press enter re-enter the same passphrase again to confirm. If the passphrase is accepted the System settings screen below will be displayed.
Warning
Do not loose this passphrase, there is no way to recover it. A reinstallation will be required if you loose the passphrase.
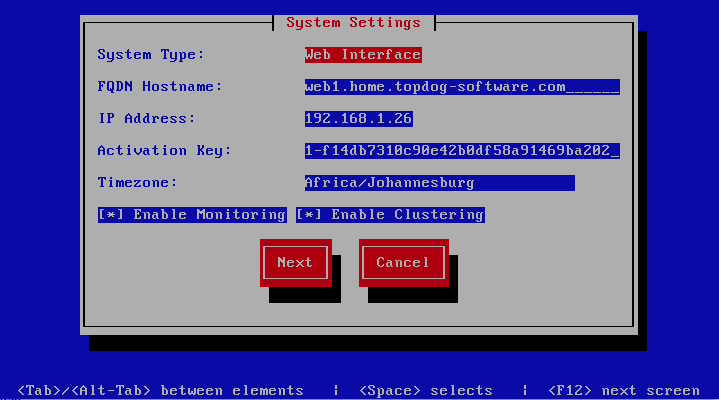
System Settings
This screen configures the basic system settings. The description of the options is as follows:
| Option | Description |
|---|---|
| System Type | Set this to Web Interface |
| FQDN Hostname | This is the Fully qualified domain name This cannot be set to localhost |
| IP Address | The system IP address usually detected |
| Activation Key | Baruwa Enterprise Edition Activation Key |
| Timezone | The system timezone, detected from the system configuration. |
| Enable clustering | Check this |
| Enable Monitoring | Check this to enable the NRPE service |
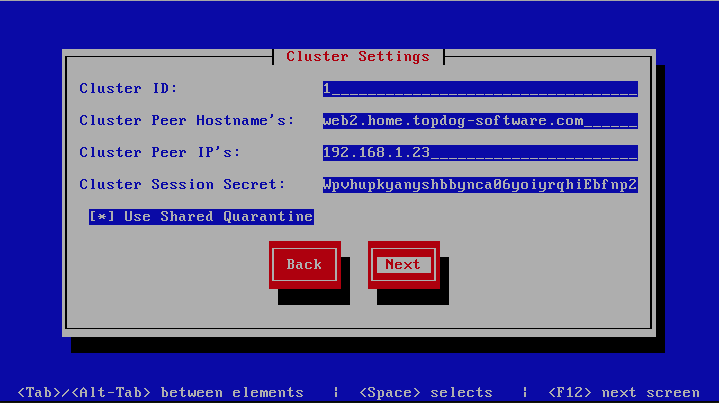
Cluster Settings
This screen configures the cluster settings. The description of the options is as follows:
| Option | Description |
|---|---|
| Cluster ID | An integer number unique to each node
|
| Cluster Peer Hostname’s | A space separated list of this nodes peers
|
| Cluster Peer IP’s | A space separated list of this nodes peers
|
| Cluster Session Secret | This is used to encrypt session information
a long password string over 35 characters,
the same value should be used on all the
cluster members. You can use a service such
as passwordsgenerator.net to generate it
|
| Use Shared Quarantine | Check this to enable Shared quarantine
|
Management Settings
This screen sets the management account settings, The description of the options is as follows:
| Option | Description |
|---|---|
| Username | Administrator username
|
| Password | Administrator password, Only strong passwords will be
accepted use a service such as passwordsgenerator.net
to generate strong passwords
|
| Confirm Password | Renter the Administrator password
|
| Email Address | Administrator email address
|

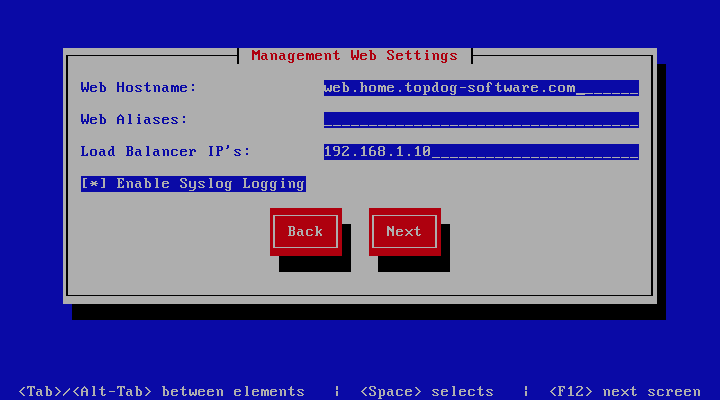
Management Web Settings
This screen sets the management web interface settings, The description of the options is as follows:
| Option | Description |
|---|---|
| Web Hostname | The hostname to be used to access the web interface
|
| Web Aliases | Alternative hostnames to use to access the web
interface. Use a space to separate multiple entries
|
| Load Balancer IP’s | Proxy-Protocol load balancers, space separated IP
Address list
|
| Enable Syslog Logging | Turns on Web logging to syslog
|
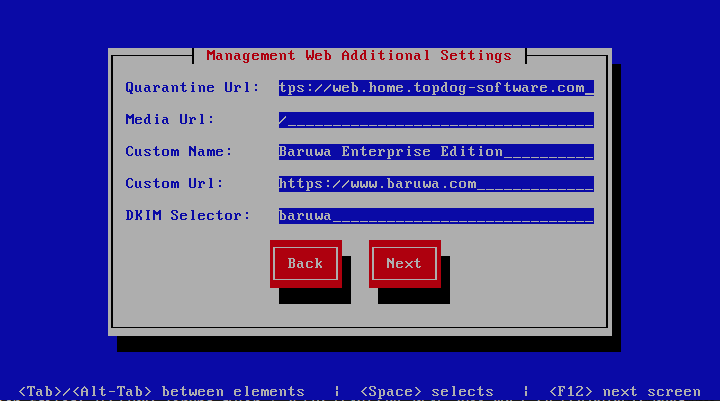
Management Web Additional Settings
This screen sets the additional management web interface settings, The description of the options is as follows:
| Option | Description |
|---|---|
| Quarantine URL | This is default host url used in quarantine report
links, is overridden by domain settings.
|
| Media URL | This can allow you to host media on a CDN or media
host, leave as default to serve of the same system.
|
| Custom Name | This will replace all occurrences of Baruwa in the web
interface as well.
|
| Custom URL | This creates links to your product page within the web
interface and email reports that are sent out.
|
| DKIM Selector | Sets the DKIM selector name, used to configure DKIM
signing.
|
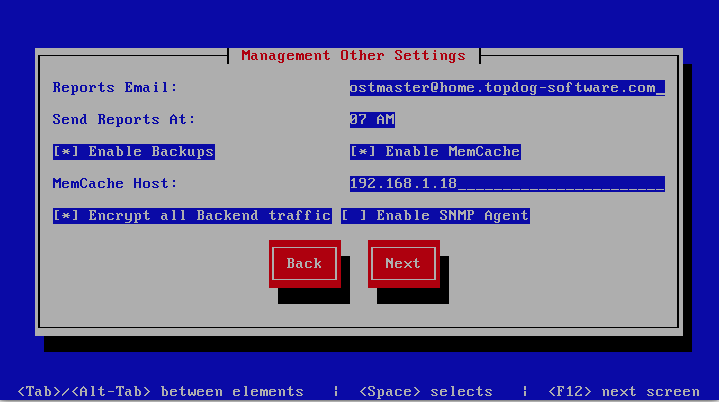
Management Other Settings
This screen sets other management settings, The description of the options is as follows:
| Option | Description |
|---|---|
| Reports Email | The email address used to send out email reports
|
| Send Reports At | The hour at which to send reports, this is localized
to the users location based on their timezone setting
|
| Enable Backups | Enables or disabled the backup system [Baruwa Backups]
|
| Enable Memcache | Enables or disables the Memcached cache system, when
disabled the builtin cache system will be used. The
builtin cache system is more efficient on standalone
systems
|
| MemCache Host | The IP Address of the MemCache server
|
| Encrypt all Backend Traffic | This will encrypt all traffic between the front end
and back end systems. You should turn this on if the
connections between your front end and back end are
over insecure networks and you do not have VPN
connections setup. Detailed information on this feature
can be found in the release notes at
|
| Enable SNMP Agent | Enables the SNMP Agent which makes the system status
available via SNMP. This option is ineffective if
monitoring has not been enabled.
|
Database Settings
This screen sets database settings, The description of the options is as follows:
| Option | Description |
|---|---|
| Host | The database server IP Address
|
| Port | The database port
|
| Admin Password | The database admin user password, Only strong passwords
that do not contain the symbols
', ", @,$, # and : will be accepted. |
| Confirm Admin Password | Confirm the database admin user password
|

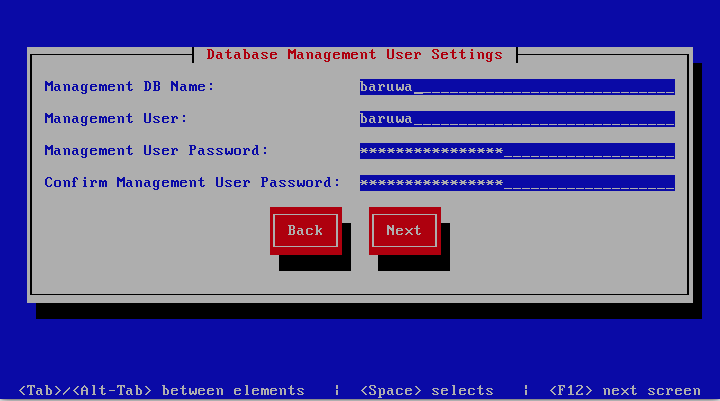
Database Management User Settings
This screen sets database management user settings, The description of the options is as follows:
| Option | Description |
|---|---|
| Management DB Name | The name of the management database
|
| Management User | The management database username
|
| Management User Password | The management database user password, Only strong
passwords that do not contain the symbols
',", @, #, $ and : will be accepted. |
| Confirm Management User Pass | Confirm the management database user password
|
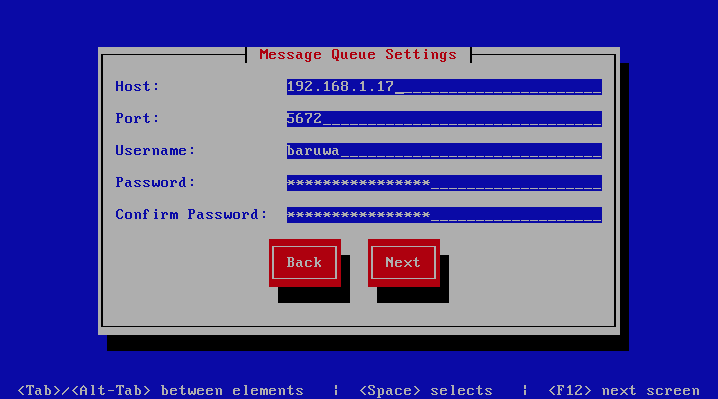
Message Queue Settings
This screen sets message queue settings, The description of the options is as follows:
| Option | Description |
|---|---|
| Host | The message queue server IP address |
| Port | The message queue server port |
| Username | The message queue server username |
| Password | The message queue server password |
| Confirm Password | Confirm the message queue server password |
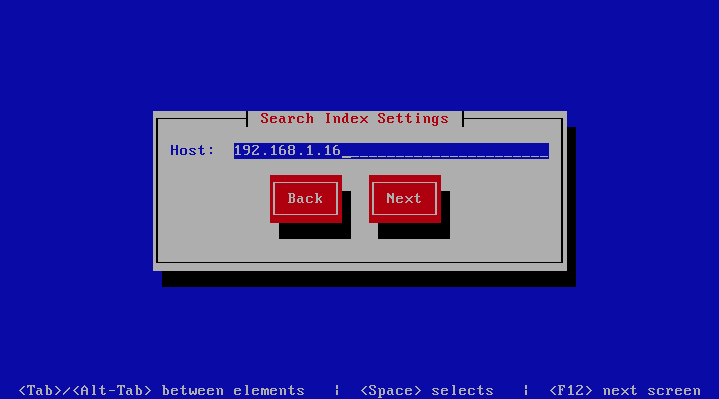
Search Index Settings
This screen sets search index settings, The description of the options is as follows:
| Option | Description |
|---|---|
| Host | Indexing server IP address
|
SSL/TLS Settings
The Baruwa web interface MUST ran over SSL/TLS, other services such as SMTP AUTH
only work over SSL/TLS as well. So you need to either purchase a valid SSL certificate
or have baruwa-setup automatically request a CertBot certificate or generate one
non recognised SSL certificate for you.
If you do not have a CA issued certificate and do not intend on purchasing one the leave
the I have a CA issued Certificate unchecked.
Certbot certificate
The issuance of a CertBot certificate is based on an automated check that verifies that the hostnames specified are under your control. Baruwa performs a precheck to verify that the hostnames resolve to a public IP address on the host itself. If this check fails then the Certbot certificate will not be requested. This check will fail if your public IP address is on another device and you are forwarding connections to a private address on your Baruwa system. To work around that you need to create a check file:
touch /etc/baruwa/acme.enable
For the validation process to succeed, Certbot systems need to be able to connect to port 80 on your system, ensure that that is allowed on your network devices.
Certbot certificates are only issued to systems of the Standalone System, Web and Mail System and Web Interface System profiles.
Certbot certificates are issued only to the web hostname, web aliases and the mail hostname. Cluster members names are not included in the certificate.
Support for CertBot certificates was added in BaruwaOS 6.8, refer to the ACME TLS Certificates section of the release notes for more information.
Note
It is currently not possible to issue or syncronize certificates in a cluster that uses the same hostname. If you are operating a cluster you should either purchase a Commercial CA issued certificate or use Builtin certificates.
Builtin certificate
The certificate that baruwa-setup generates will cover the web hostname, web aliases,
cluster members and the mail hostname. This means that you should copy this certificate to
other cluster hosts that you specified and select I have a CA issued Certificate on
those hosts when you set them up instead of generating new certificates for them.
Commercial CA issued certificate
Note
We have partnered with the SSLShop to bring you discounted
SSL certificate pricing. RapidSSL CA signed certificates can
be purchased at discounted pricing using the Discount coupon
“BARUWA” from http://www.sslshop.co.za
If you have a SSL certificate that is issued by a recognised CA and would
like Baruwa to use it, install it prior to running baruwa-setup. Please NOTE
that you need certificates that cover the web hostname and aliases, and the mail
hostname. Please check I have a CA issued Certificate.
The preferred location to install certificates and keys on the server is under /etc/pki.
You need to create a directory structure under that and store your certificate under it.
The following example creates a baruwa directory under /etc/pki and stores the
certificates and keys there:
mkdir -p /etc/pki/baruwa/{certs,private}
Create the following files
/etc/pki/baruwa/certs/baruwa.pemwith the contents of your SSL certificate/etc/pki/baruwa/private/baruwa.keywith the contents of your SSL private key
If your SSL certificate is signed using an intermediate certificate, you need to append
the intermediate certificate to the file /etc/pki/baruwa/certs/baruwa.pem. The server
certificate must appear before the intermediate certificate in the combined file.
You need to create additional certificate pairs if your web hostname and mail hostname are not the same.
If you have a wildcard certificate with all your names being subdomains of that domain to which the certificate is issued then you can simply create one pair.
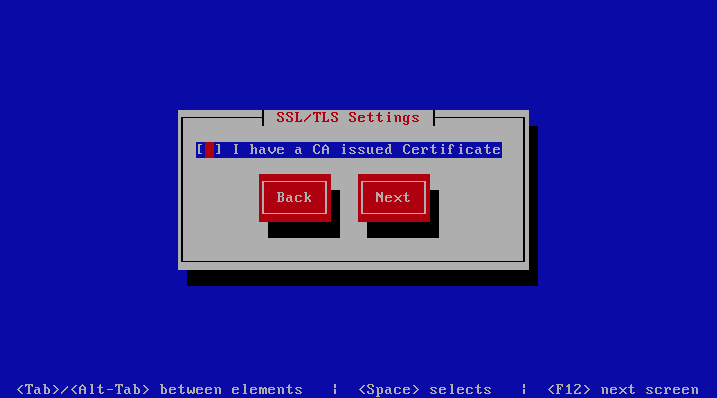
If you left I have a CA issued Certificate unchecked you will be presented with
the following screen. You need to fill in the details which are used to create a
CA from which the certificate will be issued. The description of the options is as
follows:
| Option | Description |
|---|---|
| Organization | OpenSSL CA Name
|
| Email Address | OpenSSL email address
|
| Country | OpenSSL country code
|
| Province | OpenSSL province
|
| City | OpenSSL city
|
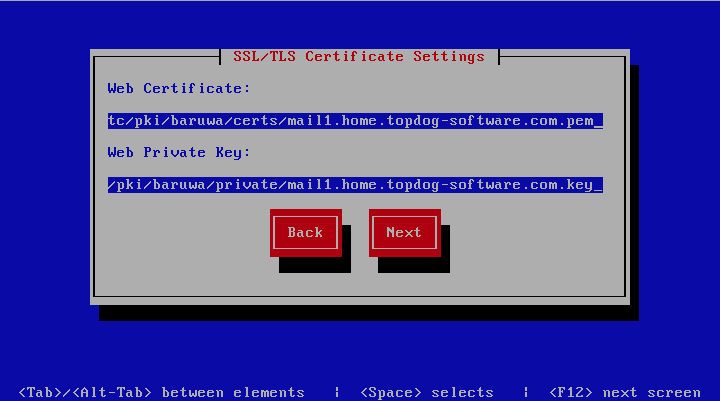
If you checked I have a CA issued Certificate you will be presented with the following
screen, you need to specify the locations of your certificate and key. The description of
the options is as follows:
| Option | Description |
|---|---|
| Web Certificate | The location of the web certificate file in PEM format |
| Web Private Key | The location of the web private key file in PEM format |
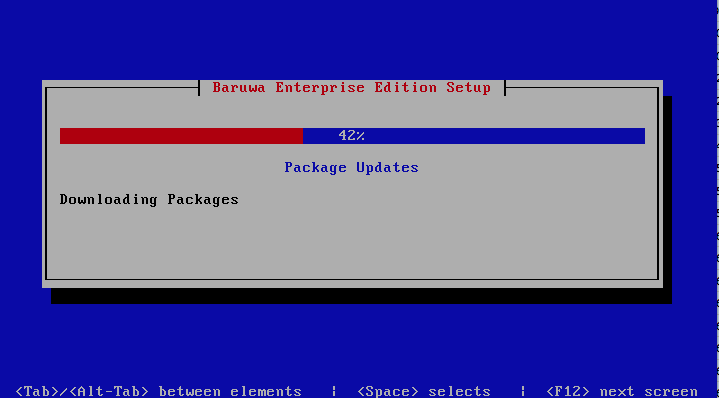
Setup Running
The baruwa-setup program will now ran the setup processes to configure
the system. The processes include updating all the packages on the system.
If a newer version of baruwa-setup is downloaded and installed, the
process will reload the baruwa-setup command. When this happens a
notification message with a 30 second countdown timer will be displayed
and the baruwa-setup command will reload and display the initial
(System Settings) screen. If this happens simply press the next
button or the F12 key until you get to the Setup Running screen
again.
At this point there is nothing left for you to do until the setup is complete.
The program will update the screen with status information as well as logging
it to /var/log/messages. If an error occurs the error information will be
displayed until you press the enter button and the program will exit.
Warning
If an error occurs while running setup, DO NOT REINSTALL the system copy
the error and contact support.
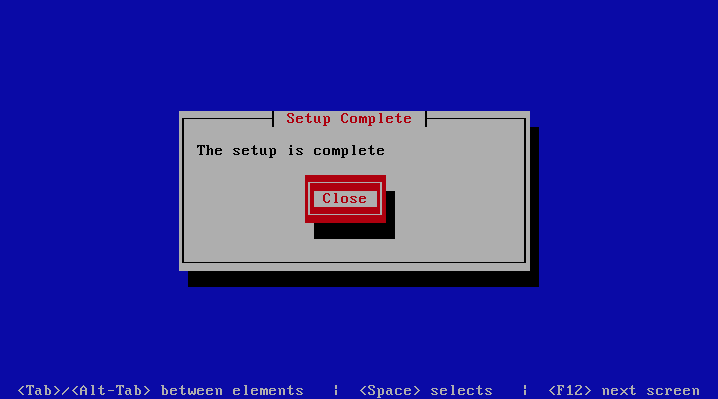
Setup Complete
When the setup is complete the following screen will be displayed simply press enter and the program will exit
To ensure that all the settings are correctly applied reboot the server
from the command line using the command:
reboot
Post Configuration
Now that the installation and setup are complete, you need to finalize the setup by Adding a Scanning Node, Adding an Organization, Adding a Domain and Adding an Account. This is done through the management web interface.
The exact sequence to follow is:
- Add the Node
- Add an Organization
- Add a Domain to the Organization
- Add a delivery server for the Domain
- Add a Domain Administrator Account for the organization
- Edit the Organization and assign Domain Administrator to the organization
- Add any user accounts to the Domain if not using external authentication
Review the DNS, Administrators guide, Email Protection Best Practices and Advanced configuration sections for other configuration and setup options available.